 |

|
|

|
Calling MapPoint From C++ Without the MFC Safety NetRichard Marsden shows you how to access the MapPoint COM interface from C++ without using MFC. The code has been tested with Visual C++, Intel C++ Compiler, and C++Builder.
If you wish to use MapPoint�s COM interface from C++, then you will quickly find that documentation and tutorials are virtually non-existent. The few examples that do exist use a handful of COM functions and classes from MFC (Microsoft Foundation Classes); but many Win32 C++ programmers use non-Microsoft compilers and development environments. Also, many of those who do use such environments are moving away from MFC. MFC was great when it appeared about ten years ago, but now it is a proverbial dinosaur: old and lumbering. Standard libraries such as the STL have superseded much of the MFC. For a while now, MFC has only really been necessary for its object oriented GUI interface. With the advent of the much smaller WTL (Windows Template Library), we can finally say goodbye to MFC. The following tutorial shows you how to use C++ to control MapPoint through its COM interface whilst avoiding MFC. The code has been built and executed using Visual C++ 5.0, and has also been tested against the IA-32 version of the Intel 7.1 compiler. It should be fairly simple to use this code with other Windows C++ environments and compilers. If you are going to use the WTL, you will need to install it. It is available for download from Microsoft ( Download Center ) Tutorials and guides for using the WTL can be found at CodeProject ( Windows Template Library ), CodeGuru ( ATL & WTL Programming ), on YahooGroups ( WTL support list ), as well as your local friendly Google. So let�s get started... First create a new project. If you have the WTL installed, use the ATL/WTL AppWizard. For this tutorial I chose an SDI Application, but you can choose any of the application templates. I find Dialog Applications are very useful for utilities. Select the COM Server option if you wish to receive events or if you wish to create an Add-in. Your application does not need to be a COM server if it is only going to receive objects from MapPoint. If you are not using the WTL AppWizard, you will need to initialize the COM system. WTL does this in the function _tWinMain, with the line: HRESULT hRes = ::CoInitialize(NULL); Then at the end of execution, finishes with: ::CoUninitialize(); These must be in the same thread as your MapPoint calls. You now have an application that can use COM objects. Next you need to tell your program about the MapPoint API. To do this, you need to locate MapPoint�s .tlb file, which can be found in your main MapPoint directory. For MapPoint 2004 North America, the file is called �mpna82.tlb�. Create a source file called �mpinterfaces.cpp� and include the following, substituting .tlf pathname: #include "StdAfx.h" /****************************************************************************/ #include "mpinterfaces.h" #pragma pack(push,MPInterfaces) /****************************************************************************/ /****************************************************************************/ #undef EOF #import "C:\Program Files\Microsoft MapPoint 2004\mpna82.tlb" implementation_only /****************************************************************************/ /****************************************************************************/ #pragma pack(pop,MPInterfaces) /****************************************************************************/ /* * $Log$ * * */ /****************************************************************************/ Similarly, create an include file called �mpinterfaces.h� and include the following: /****************************************************************************/ #ifndef MPINTERFACES_H #define MPINTERFACES_H #pragma once #pragma pack(push,MPInterfaces) /****************************************************************************/ /****************************************************************************/ #undef EOF #import "c:\Program Files\Microsoft MapPoint 2004\mpna82.tlb" no_implementation /****************************************************************************/ /****************************************************************************/ #pragma pack(pop,MPInterfaces) #endif // GXINTERFACES_H /****************************************************************************/ /* * $Log$ * * */ /****************************************************************************/ Note the �#undef EOF�: This is a bit of a kludge to get around some poor design on Microsoft�s part. The MapPoint interface includes a definition for �EOF�, even though this is already defined in various standard C++ include files! The #undef helps to fix this, but it is strongly recommended that you do not mix file I/O (eg. steams) and MapPoint calls in the same class definition. Add these two files to your project. You can now perform a test build. If you run your application, you should get an empty template application with no errors. Now we can add some calls to control MapPoint. For this tutorial, I shall add the MapPoint code to the OnFileNewMethod of CMainFrame (in mainfrm.h, created by the wizard). This is for demonstration purposes only; in reality you would put it somewhere else. First, add the following two lines to the beginning of mainfrm.h: #include "mpinterfaces.h" using namespace MapPoint; The tutorial code for OnFileNewMethod is:
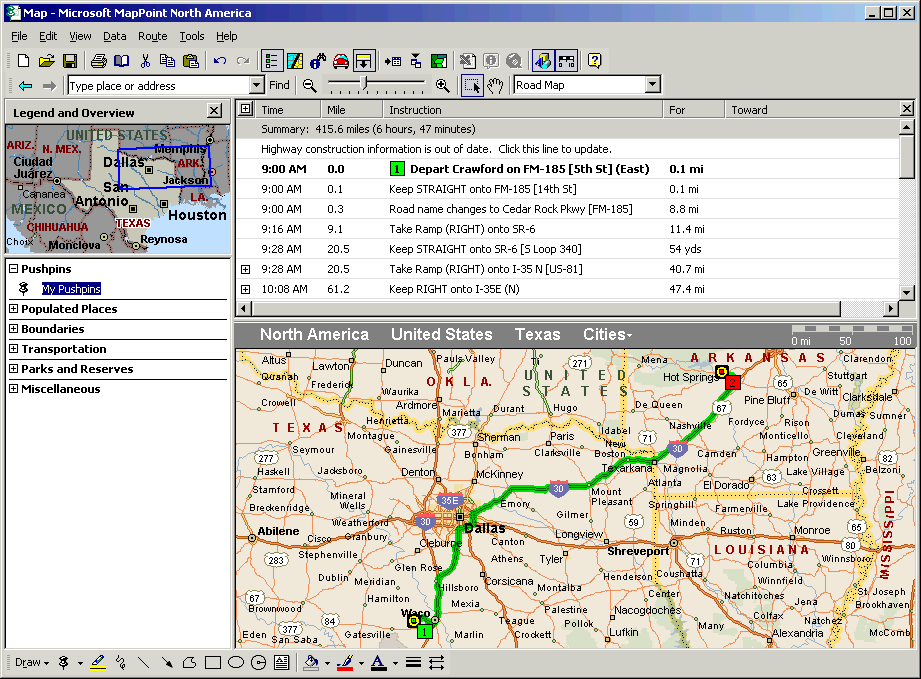
Hopefully, most of this code is fairly self-explanatory, although many of the objects and methods might be new. I shall go through it line by line. The main MapPoint application object is called _Application, and is encapsulated by _ApplicationPtr. The encapsulation handles things like reference counting and passing between application threads. Whenever MapPoint returns (or creates) a new object it returns it encapsulated like this. The code below will create an instance of MapPoint using the default version. As with Visual Basic, you can select different versions, e.g. �MapPoint.Application.NA.11�. // First we create a MapPoint _Application object and display it _ApplicationPtr myMapPointPtr; myMapPointPtr.CreateInstance( "MapPoint.Application" ); To do anything useful, we need to get a valid pointer to the _Application object. // Get a pointer to the internal _Application object _Application* myMapPoint = (_Application*)myMapPointPtr; ATLASSERT( myMapPoint!=NULL ); myMapPoint is a pointer our _Application object. Members and methods are called as with conventional C++. For example, to display MapPoint: // Set some flags myMapPoint->Visible = true; // display the mappoint window myMapPoint->PutWindowState( geoWindowStateNormal ); Let�s create some other objects. _Map contains most of the functionality, so we�ll get a pointer to that first: // Most operations are through the map object, so get a // pointer to the current _Map object _MapPtr myMapPtr = myMapPoint->ActiveMap; _Map* myMap = (_Map*)myMapPtr; ATLASSERT( myMap!=NULL ); Now we can find some locations. To create a Location object for a known longitude and latitude, we use the _Map.GetLocation() method: // Let's create a location object for the centre of Crawford, TX, altitude 10. LocationPtr locCrawfordPtr = myMap->GetLocation( 31.53419, -97.44318, 10 ); Location *locCrawford = (Location*)locCrawfordPtr; ATLASSERT( locCrawford!=NULL ); Adding a pushpin is just as easy: // Add a Smiley pushpin at Crawford PushpinPtr pinCrawfordPtr = myMap->AddPushpin( locCrawford, "Crawford, TX" ); Pushpin* pinCrawford = (Pushpin*) pinCrawfordPtr; pinCrawford->Symbol = 200; Once we have a Location we can move to it, using the Location�s Goto() method: // Move to Crawford locCrawford->GoTo(); Locations can also be searched for. This is performed by using the _Map.FindAddressResults() method, which returns a FindResults object:
	// Find Hot Springs, AR (and demonstrate the use of collections and variants)
	FindResultsPtr resultsPtr = myMap->FindAddressResults("","Hot Springs","","AR","");
	FindResults* myResults = (FindResults*)resultsPtr;
	ATLASSERT( myResults->Count > 0);
The FindResults object is actually a collection. This is accessed as a 1-referenced array, using the GetItem() method to access the individual locations. To pass values to GetItem() we must use the VARIANT class. There is probably a more convenient template, but the following works well: // FindResults is collection. This particular example returns multiple locations. // Pick the first one. NB: GetItem is 1-referenced. VARIANT idx; VariantInit(&idx); V_VT(&idx) = VT_I4; V_I4(&idx) = 1; // the value we wish to pass LocationPtr locHotSpringsPtr = myResults->GetItem( &idx ); Location* locHotSprings = (Location*)locHotSpringsPtr; VARIANTs are used to pass objects of different types. This VARIANT is set up to be a 4 byte integer, and is used to pass the value �1� to myResults->GetItem(). Here, it is a very verbose way of performing things, but VARIANTs implement a lot of flexibility and can be used to pass different types including strings, and lists of locations. Now we have a Location object for Hot Springs, we can add a pushpin there as well: // Add a Smiley pushpin at Hot Springs PushpinPtr pinHotSpringsPtr = myMap->AddPushpin( locHotSprings, "Hot Aprings, AR" ); Pushpin* pinHotSprings = (Pushpin*) pinHotSpringsPtr; pinHotSprings->Symbol = 200; We have two locations, so lets find a route between them both. MapPoint only supports one route at a time. A reference to this is accessed with the _Map.GetActiveRoute() method. // Get MapPoint's route object, so we can find a new route RoutePtr myRoutePtr = myMap->GetActiveRoute(); Route* myRoute = (Route*)myRoutePtr; myRoute->Clear(); Waypoints are also implemented as collections, but adding a waypoint to the end of the current collection is easily performed using the Add() method: // Add the two locations as start and end waypoints myRoute->Waypoints->Add( locCrawford, "Crawford" ); myRoute->Waypoints->Add( locHotSprings, "Hot Springs" ); The route is calculated using the Route.Calculate() method. Calculate() will throw an exception if the wrong version (Europe vs North America) of MapPoint is being used, due to the lack of roads for suitable routes.
	try
	{
		myRoute->Calculate();
	}
	catch (...)
	{
		// this shouldn't happen, unless you are using the European Edition
		MessageBox("Could not find a route between Crawford and Hot Springs.");
	}
That is it! Before we stop and wait for the user, we should tidy some things up. We have made temporary changes to the map, so it would be good to suppress the �Save Map?� dialog box when MapPoint exits. Do this with the _Map.Saved member: // Suppress the "Save Map?" dialog box myMap->Saved = true; Next we must release all of the COM objects. When MapPoint finally exits, it will remain in memory until all references to all COM objects are removed. // Release COM pointers myRoutePtr.Release(); pinHotSpringsPtr.Release(); locHotSpringsPtr.Release(); pinCrawfordPtr.Release(); locCrawfordPtr.Release(); myMapPtr.Release(); Next we display a simple modal box and wait for the user to click �OK�:
	// Finish
	MessageBox("Demo has completed, press OK to tidy up and remove MapPoint.");
Next we close MapPoint with the Quit() method. Note that this will only work if the user has not already closed MapPoint. If they have done, then Quit() will throw an exception, and a zombie MapPoint will stay in memory. The best way to get around this in a production system is probably to trap the Quit event from MapPoint.
	try
	{
		// Attempt to close MapPoint, if it has not been closed already
		myMapPoint->Quit();
	}
	catch (...)
	{
	}
So there you have it, a simple application in C++ without any of the MFC overhead! This approach works well for me and I have already used it in a number of applications. The above approach should also work with other C++ development environments with only a few minor changes. If you are working with C++ Builder, you do not need to create the mpinterface.h and mpinterface.cpp. Instead, you should select the "Import Type Library" menu selection, and then drag & drop the MapPoint OLE Components TApp and TMap into the CBuilder form. C++ Builder does not bring in all of the object properties, so sometimes you have to use the set and get methods instead. Eg. App->set_Units( geoKm ); Acknowledgements Garry Kernan (g.kernan(AT)shaw.ca) for the information about using C++ Builder to call MapPoint.
 Author: Richard Marsden Author: Richard MarsdenEmail: enquiries(AT)winwaed.com URL: http://www.winwaed.com Richard Marsden is the proprietor of Winwaed Software Technology, LLC which provides software consulting and development services, specializing in both MapPoint and online mapping applications. He operates the Mapping-Tools.com Website for MapPoint Tools and Utilities, and recently launched the GeoWeb Guru a community website for developers of the geospatial web. In 2008, Richard was awarded Virtual Earth MVP status by Microsoft. Prior to Winwaed, Richard worked as a software developer working on seismic processing algorithms for the oil exploration industry. He holds geology and geophysics degrees from the University of Cambridge (Churchill College), and the University of Durham; and an interdisciplinary MBA from the University of Dallas.
|
|
||||||||||||||||||||||||||||||||||||||||||||||||||||||||||||||||||
|
|
||||||||||||||||||||||||||||||||||||||||||||||||||||||||||||||||||||


