|

|
|

|
BackAndForwardUtility: A Simple .NET Add-in for Microsoft MapPointMapPoint 2009 introduced a new redesigned and streamlined interfaced which eliminated a couple of little-used buttons - the back and forward buttons for navigating map views. Richard Marsden shows how to get the functionality back using a .NET Add-in.
This article demonstrates how to create a simple COM add-in for Microsoft MapPoint, written using the .NET framework. This add-in implements the �Back� and �Forward� view buttons as menu items on the Tools menu. These are absent in MapPoint 2009, but the underlying API calls are still present.
The add-in is very simple with only two menu items and two short menu event handlers. It is implemented using C#. The project is created using Visual Studio 2005 and requires version 2.0 of the .NET framework. The completed installer and the source code (released under the Berkeley License) are available from http://www.mapping-tools.com/backandforwardutility/index.shtml .
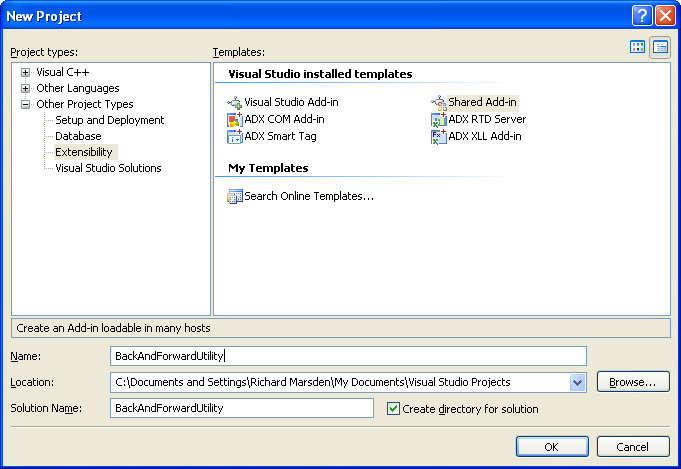
So let�s start building the project!� Start Visual Studio 2005, and select Create Project. Select Shared Add-in from the Extensibility project templates, and enter the name of your project (BackAndForwardUtility):
Press OK. This will start the Visual Studio Add-in Wizard. Select your required programming language on the first panel of the wizard. We shall choose Visual C#.
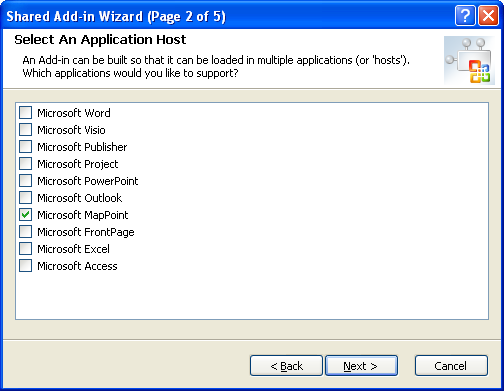
The second panel lets you choose the application host. We want our add-in to work with MapPoint and only MapPoint. Set the MapPoint checkbox, and clear all of the other check boxes:
MapPoint will only appear in this dialog box if it has been installed and the COM server has been registered properly. Re-install if it does not appear. A reboot might be necessary.
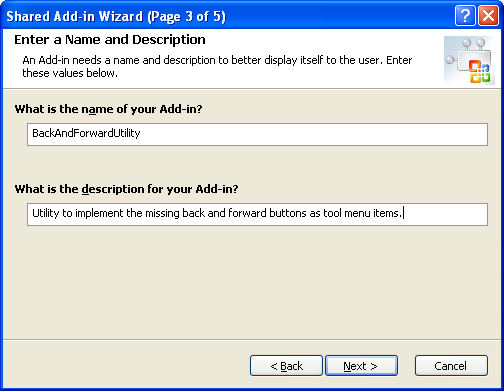
The third panel lets you enter add-in name and description to be used by MapPoint:
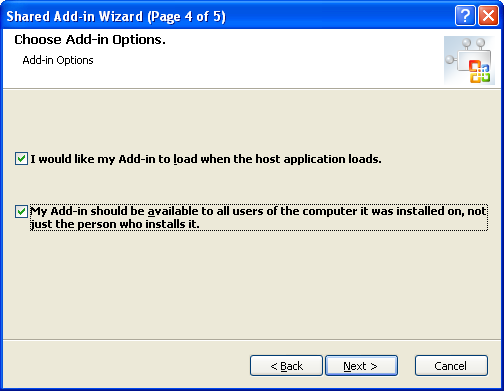
The fourth panel lets you choose how the add-in will be installed and loaded. We shall set it to load with the application (so it is always on the Tools menu), and for it to be available for all users:
The fifth and final panel simply summarizes your options. Press Finish to complete the wizard.
The wizard will create a solution with both the main add-in project and a setup project. For now we shall concentrate on the add-in. The main add-in code is in Connect.cs. This controls the connection of the add-in to MapPoint, eg. Adding / removing menu items, and handling event callbacks.
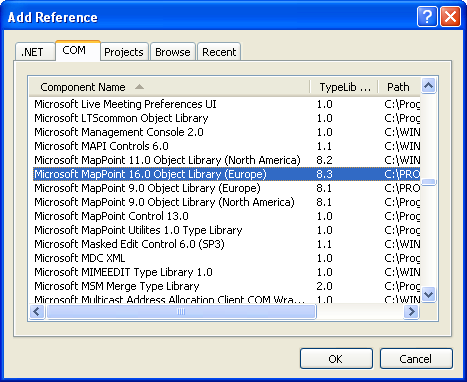
You may have to manually add the MapPoint references. Do this by right clicking on the project in the Solution Explorer and select �Add Reference�. Then select the Microsoft MapPoint object library from the list of available COM components. In this example we choose MapPoint Europe 2009. MapPoint 2009 has a COM library version of 16.0. It does not matter if you select the European or North American edition. The final add-in will work with both.
Visual Studio will add a MapPoint TLB file and COM interop for MapPoint to the installation package, the first time the installer is built.
Our add-in requires two menu items and matching callbacks. All of this code is implemented in the main Connect.cs source file, because it is very simple. A more substantial add-in should be implemented with multiple classes. Dialog boxes would also require their own classes.
Here is the complete Connect.cs source code. All of the comments are mine: For clarity, I have removed the boilerplate comments created by Visual Studio.
namespace BackAndForwardUtility { ������ using System; ������ using Extensibility; ������ using System.Runtime.InteropServices; ��� using MapPoint;
������ ������ /// <summary> ������ ///�� The object for implementing an Add-in. ������ /// </summary> ������ /// <seealso class='IDTExtensibility2' /> ������ [GuidAttribute("F769F18E-DF0C-4957-9CC1-262D12D73C79"), ProgId("BackAndForwardUtility.Connect")] ������ public class Connect : Object, Extensibility.IDTExtensibility2 ��� {
������� #region Private Members
������� private MapPoint.Application thisApp; ������� private object addInInstance;
� ������#endregion
������� #region Menu Call Backs
������� /// <summary> ������� /// Implement the "Back" or "Previous" action ������� /// Note: GoBack() throws an exception if a previous view does not exist ������� /// Therefore catch this silently. ��� ����/// </summary> ������� public void PreviousView() ������� { ����������� if (thisApp != null) ����������� { ��������������� try ��������������� { ������������������� thisApp.ActiveMap.GoBack(); ��������������� } ��������������� catch ��������������� { } ����������� } ������� }
������� /// <summary> ������� /// Implement the "Next" or "Forward" action ������� /// Note: GoForward() throws an exception if a previous view does not exist ������� /// Therefore catch this silently. ������� /// </summary> ���� ���public void NextView() ������� { ����������� if (thisApp != null) ����������� { ��������������� try ��������������� { ������������������� thisApp.ActiveMap.GoForward(); ��������������� } ��������������� catch ��������������� { } ����������� } ������� }
������� #endregion
������������� public Connect() ������������� { ������������� }
������������� /// <summary> ������������� /// Called by MapPoint when the add-in is loaded and a connection is made ������������� /// </summary> ������������� public void OnConnection(object application, Extensibility.ext_ConnectMode connectMode, object addInInst, ref System.Array custom) ������������� { ����������� // Keep references to the instance and the parent MapPoint Application �������������������� thisApp = application as MapPoint.Application; �������������������� addInInstance = addInInst;
������ ������������� �����if (thisApp == null) �������������� ����������� �return;
����������� // Add the two menu items ����������� // The '&' characters mark Windows menu hot keys thisApp.AddCommand("P&revious Map View", "PreviousView", this); thisApp.AddCommand("Ne&xt Map View", "NextView", this); ������ }
������������� /// <summary> ������������� /// Called when MapPoint disconnects the addin � eg. as MapPoint closes ������������� /// </summary> ������������� public void OnDisconnection(Extensibility.ext_DisconnectMode disconnectMode, ref System.Array custom) ������������� { thisApp.RemoveCommands(this); ������������� }
������������� public void OnAddInsUpdate(ref System.Array custom) ������������� { ������������� }
������������� public void OnStartupComplete(ref System.Array custom) ������������� {
������������� }
������������� public void OnBeginShutdown(ref System.Array custom) ������������� {
������������� }
��� } }
We should now have a working add-in and installer. We shall add a couple of items to the installer to make it easier to use. We need a Start Menu folder that has links to the license text and the uninstaller.
We will start with the uninstaller. We need to create a short batch file that executes msiexec. Create a batch file in the BackAndForwardUtility project directory called uninst.bat with the following contents:
@echo off REM Uninstall script for the BackAndForwardUtility add-in for Microsoft MapPoint REM http://www.mapping-tools.com/backandforward/index.shtml %WINDIR%\system32\msiexec.exe /x %1
Add this file to the installer project (BackAndForwardUtilitySetup). This will ensure that it is installed with the rest of BackAndForwardUtility.
Similarly create a text file called license.txt and enter the license text before adding it to the installer project. The BackAndForwardUtility is distributed under the Berkeley License:
License for the BackAndForwardUtility -------------------------------------
Copyright (c) 2009, Winwaed Software Technology LLC All rights reserved.
Redistribution and use in source and binary forms, with or without modification, are permitted provided that the following conditions are met: * Redistributions of source code must retain the above copyright notice, this list of conditions and the following disclaimer. * Redistributions in binary form must reproduce the above copyright notice, this list of conditions and the following disclaimer in the documentation and/or other materials provided with the distribution. * Neither the name of Winwaed Software Technology LLC nor the names of its contributors may be used to endorse or promote products derived from this software without specific prior written permission.
THIS SOFTWARE IS PROVIDED BY Winwaed Software Technology LLC ''AS IS'' AND ANY EXPRESS OR IMPLIED WARRANTIES, INCLUDING, BUT NOT LIMITED TO, THE IMPLIED WARRANTIES OF MERCHANTABILITY AND FITNESS FOR A PARTICULAR PURPOSE ARE DISCLAIMED. IN NO EVENT SHALL Winwaed Software Technology LLC BE LIABLE FOR ANY DIRECT, INDIRECT, INCIDENTAL, SPECIAL, EXEMPLARY, OR CONSEQUENTIAL DAMAGES (INCLUDING, BUT NOT LIMITED TO, PROCUREMENT OF SUBSTITUTE GOODS OR SERVICES; LOSS OF USE, DATA, OR PROFITS; OR BUSINESS INTERRUPTION) HOWEVER CAUSED AND ON ANY THEORY OF LIABILITY, WHETHER IN CONTRACT, STRICT LIABILITY, OR TORT (INCLUDING NEGLIGENCE OR OTHERWISE) ARISING IN ANY WAY OUT OF THE USE OF THIS SOFTWARE, EVEN IF ADVISED OF THE POSSIBILITY OF SUCH DAMAGE.
Further details about the BackAndForwardUtility can be found at:
http://www.mapping-tools.com/backandforward/index.shtml
Now we just need to create the Start Menu folder. Double click on one of the files in the installer project to display the File System window. This shows you the file system on the target computer. It should look something like this:
The above shows the files that will be copied into the Application Folder.
Right click on User�s Program Menu and select Add->Folder.
Name the new folder �BackAndForwardUtility�. This is the name of the new
folder that will be created in the user�s Start Menu. Open the new folder, and right
click on the main pane to the right. Select Create Shortcut and navigate
to the license.txt file in the Application Folder.
Before adding the link to the uninstaller, you will need to find the Product Code. The Product Code is listed as one of the properties at the top level of the installer project (select the installer project top level in the Solution Explorer � Product Code will be in the Properties pane). For this project it is: {2AA953AE-12E5-4596-B513-BE2EEA67F994}.� Copy this code into the clipboard.
Now go back to the File System window. Select the BackAndForwardUtility folder in the User�s Program Menu that you have just created. Add a new shortcut. This time link it to uninst.bat and give it the name of �Uninstall BackAndForwardUtility�. Paste the Product Code into the Arguments property for the new shortcut. This is what it should now look like:
You are now ready to do a complete build of the add-in project and the installer!
Using .NET with MapPoint add-ins can be difficult at times, but this is all that is required to create a simple add-in and a working installer.
Both the compiled installer, and the source code can be downloaded from Mapping-Tools.com at� http://www.mapping-tools.com/backandforward/index.shtml
 Author: Richard Marsden Author: Richard MarsdenEmail: enquiries(AT)winwaed.com URL: http://www.winwaed.com Richard Marsden is the proprietor of Winwaed Software Technology, LLC which provides software consulting and development services, specializing in both MapPoint and online mapping applications. He operates the Mapping-Tools.com Website for MapPoint Tools and Utilities, and recently launched the GeoWeb Guru a community website for developers of the geospatial web. In 2008, Richard was awarded Virtual Earth MVP status by Microsoft. Prior to Winwaed, Richard worked as a software developer working on seismic processing algorithms for the oil exploration industry. He holds geology and geophysics degrees from the University of Cambridge (Churchill College), and the University of Durham; and an interdisciplinary MBA from the University of Dallas.
|
|
||||||||||||||||||||||||||||||||||||||||||||||||||||||||||||||||||
|
|
||||||||||||||||||||||||||||||||||||||||||||||||||||||||||||||||||||